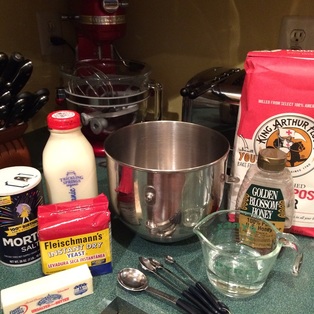
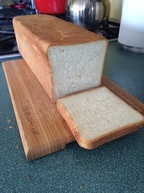
 You will need the following ingredients: 4 Cups - Unbleached, All-Purpose Flour 1 Cup - Whole, Organic Milk ½ Cup - Water 1 Tblsp - Instant DRY Yeast 6 Tblsp - Unsalted Butter, Softened 2-4 Tblsp - Honey 2 Tsp - Salt DIRECTIONS Whisk together the flour and yeast in the mixer bowl. The flour and yeast should be thoroughly mixed, so whisk briskly for at least a minute. Combine the whole milk and water in a 2-cup capacity, microwavable measuring cup, and microwave the milk/water until it is approximately 105°F (40-60 seconds on ‘High,’ depending on your microwave). Use a food thermometer after removing the measuring cup from the microwave to ensure precise temperature. If it’s not hot enough, place the milk/water back in the microwave (without the thermometer, of course), and heat incrementally until 105°F is reached. If the milk/water is too hot, simply leave it to cool to 105°F. The proper temperature is important, because the dough needs to be warm enough to allow the yeast to bud, and the dough to rise. If the solution is too hot, you’ll kill the yeast. Too cold, and the yeast won’t do anything. Place the mixer bowl on your stand mixer and mix at low speed with a dough hook. On a KitchenAid mixer, this would be speed #2. Add the butter in 1 tablespoon increments, then slowly add the heated milk/water mixture, followed by the honey, then the salt. (Note: You’ll have 2 tablespoons of butter left over from your stick. Place the remainder in the refrigerator for the time being, as you will use it later.) Use a bowl scraper to scrape the sides of the mixing bowl if necessary, while adding the ingredients. I prefer one with a handle, only because it’s easier to use. Once all the flour is moistened, increase your mixer to medium speed (#4 on a KitchenAid), and beat for 7 minutes. 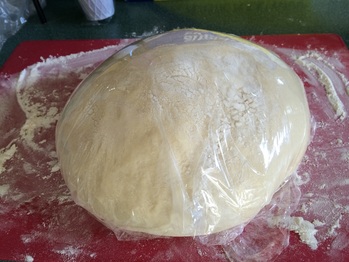 At the end of the 7 minutes, remove the dough from the mixer, and place it on a lightly floured countertop (I also use a silicone food mat). The dough should be smooth and somewhat shiny. Knead the dough by hand for a minute or two, shaping it roughly into a football. Then cover it with plastic food wrap and let it rest for 15 minutes. The dough should approximately double in size during that time if the yeast is properly active. Remove the plastic food wrap from the dough and knead by hand for another couple of minutes, gradually working it into an elongated shape for easy placement into the pain de mie pan. 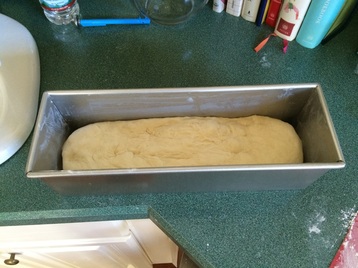 Insert the dough into a pain de mie pan that has been greased on all sides with unsalted butter, using the remainder of the stick you had placed in the refrigerator. Note: Using butter on the sides of the bread pan allows the bread to brown nicely when placed in the oven. Depress the dough with your knuckles or fists so that it uniformly covers the entire bottom of the bread pan. Slide the lid on the pain de mie pan, leaving about an inch opening at the end, covering that opening with plastic food wrap. Don’t forget to also grease the underside of the lid with your remaining unsalted butter. 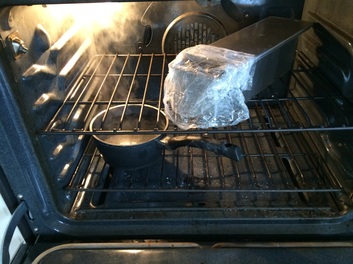 If you are not using a proof box, you can use your oven for the second dough rise. Place the bread pan on the center rack of an unheated oven to allow the dough to proof (e.g., rise) for 30-40 minutes. I also pre-boil a pot of water, and place the pot of boiling water on the bottom of the oven when I place the dough in the oven to proof. The moisture and heat from the boiling water helps the dough to rise faster. When you see the dough coming up through the 1-inch opening you left at the end of the bread pan, remove the pan from the oven, and the lid from the pan. Deflate the dough with your knuckles or fists, then slide the lid fully back on the pain de mie pan. Preheat the oven to 425°F, placing the bread pan on the center rack for 20 minutes. Make sure that the position of the pain de mie pan is such that the lid slides towards you when you place it in the oven. At the end of 20 minutes, open the oven door and carefully slide the lid of the pain de mie pan completely off, placing the lid in your sink or other safe place. I use silicone potholders for this operation. Remember, you’re handling metal that is 425°F. Leave the bread pan baking in the oven without the lid for another 8-15 minutes – depending on how brown and thick you want your crust. When the bread has browned to your desired level, remove the bread pan from the oven, and let sit for 5 minutes. The bread will shrink slightly during that time, allowing you to easily remove it from the pan. 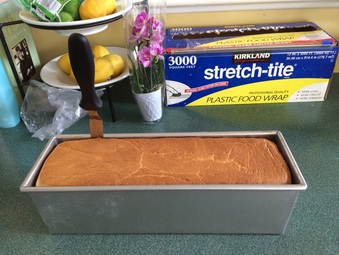 After the 5-minute cooling period, I gently run a small icing spatula around the perimeter the bread (but you can also use a standard butter knife). Spread a clean kitchen towel on your counter and, using potholders (as your bread pan will still be extremely hot), pick the bread pan up by the ends and slowly tilt the pan away from you, directly over the kitchen towel. The bread should simply tumble out of the pan onto the towel. Place the bread on a cooling rack for at least 30 minutes before slicing. The first slice is always the best! 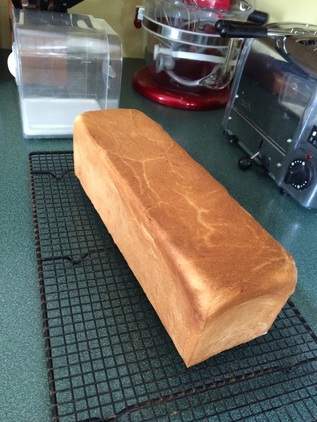 Required Equipment Probably the most critical item you’ll need to bake a standard Pullman loaf is the bread pan. I use Amco Food Service Pullman Pans with sliding Lids, and I find them to be the best bread pans I’ve ever used. They’re heavy-gauge, aluminized steel, commercial bakery pans. And perhaps most important of all, they have a silicone coating that allows the bread to simply slide out, and clean-up is a snap – ‘cause nothing sticks. These pans are available from Amazon. Just click on the links above to see them. A standard dial pocket food thermometer is what I use to ensure my milk/water mixture is at 105°F. Not sure how you can achieve that without one. You can get these for about $5. A 2-cup capacity Pyrex glass liquid measuring cup is also virtually essential to get your milk/water mixture to the proper temperature using a microwave. About $7-$9. Standard sets of dry measuring cups and measuring spoons are probably also essential. Some bakers are experienced enough to gauge by dead reckoning. But I know I’m not. You actually don’t need an electric stand mixer with a dough hook in order to make your dough. Indeed, people have been kneading dough by hand for millennia. You can mix the ingredients manually in a bowl until the dough reaches a consistency where you can take it out and knead it by hand. But figure on allowing yourself at least an extra 20 minutes to do that. Good exercise, though. If you do use an electric mixer, make sure it has a powerful enough motor to handle the density of the dough. My choice would be a standard KitchenAid, but you’ll need a fair amount of dough to get one (sorry). And So Why Is It Called a Pullman Loaf? Pullman loaves were originally called pain de mie by the French, and were baked by European bakers beginning in the early 1700’s in order to minimize crust. In the United States, the Pullman Company selected this type of loaf for standard use in all of its railroad dining cars, simply because its brick shape made it stackable, and it conserved space in the very compact dining car galleys and pantries operated by Pullman. Given that most people alive today only know of Amtrak as an operator of rail passenger service in the United States, few probably realize that up until December 31, 1968 – the Pullman Company operated virtually all sleeping car service in the country, and at its peak in 1925, operated a fleet of 9800 cars, employing 28,000 conductors and 12,000 porters. Observation-lounge bar car Hickory Creek operated on the New York Central's 20th Century Limited between New York and Chicago from 1948 until the mid-1960's. The car also had 5 double bedrooms. The on-board services, amenities and equipment offered by the Pullman Company were considered to be so superior, that virtually all famous trains operated during the last century, such as the Pennsylvania Railroad's Broadway Limited, and the New York Central's 20th Century Limited were operated for most of their existence as extra-fare, all-Pullman trains - meaning that all the railroads did was to pull the cars that were actually operated by another company - not the railroads themselves.
I sometimes wonder how many Americans today even know what a Pullman car is. Yet as recently as only 50 years ago, they were as much common-knowledge as Western Union telegrams. The company was headquartered on the South Side of Chicago. When company founder George Pullman died in 1897, Robert Todd Lincoln, son of Abraham Lincoln, was named as company president. In 1911, he was named chairman of the board of the Pullman Company, and remained in that position until 1922. He died in 1926. So there you go. More information about Pullman loaves than you could ever possibly imagine. Enjoy the bread! © 2016 David Nogar All Rights Reserved
3 Comments
7/18/2016 11:10:29 pm
I really enjoyed this David and am looking forward to trying the recipe. Give Pat a hug for me!
Reply
David Nogar
7/18/2016 11:27:05 pm
I shall! Thanks for sharing. Glad you enjoyed the blog, Doreen.
Reply
Leave a Reply. |
Author
David Nogar worked in railroad operations for almost 50 years until retiring from the transportation business in early 2023.
|

 RSS Feed